Blueberry Buttermilk Scones

Thursday, February 26, 2015

Blueberry Buttermilk Scones

I bake in the morning.
I need to leave the house at 6 am for my commute to work.
Do the math.
So, I made these Blueberry Buttermilk Scones two days in a row at 4:15 am.
Why twice? Because the first time, I cut them incorrectly and made them too big. (Hey, it was before 5 am).

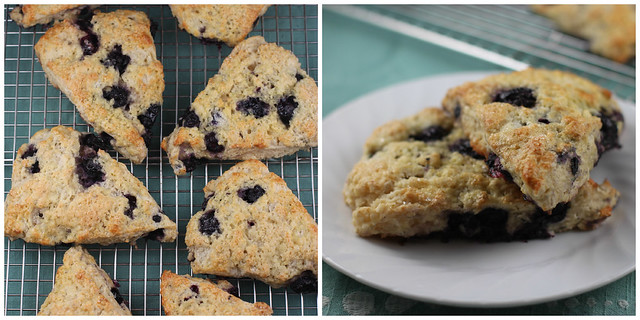
You should make these scones. Maybe even twice! But I'll let you sleep in. These would be great at a Sunday brunch.

Blueberry Buttermilk Scones
The first morning I made these, my circle cutting skills were way lacking. I was supposed to get cut it into 12 pieces, but I only cut them into 8 large pieces. Strangely, my mostly male co-workers were totally fine with the larger pieces (one said, "Then I only need to get one, and not seconds!")

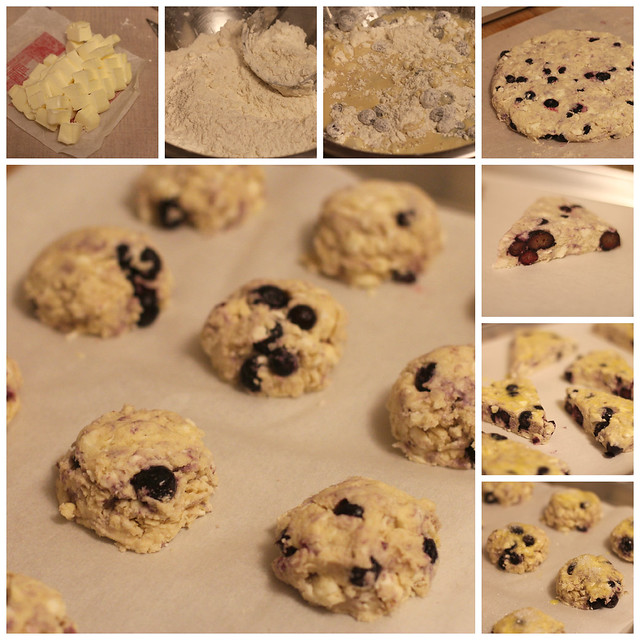
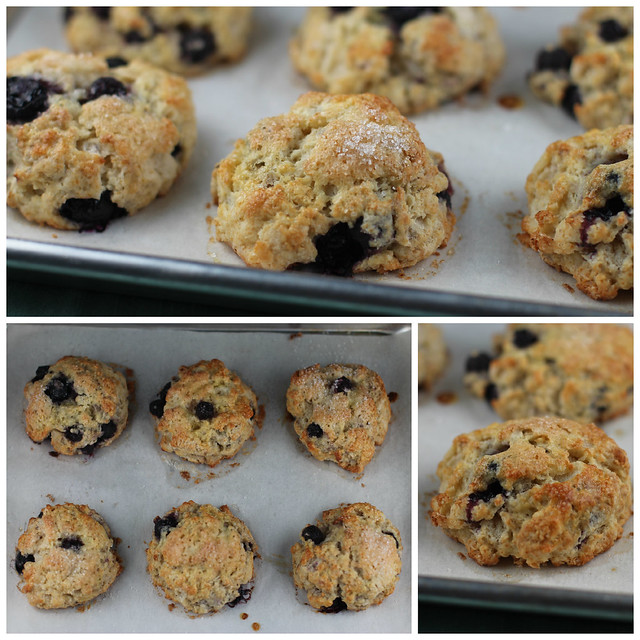
The second morning I made these, I scooped them with an ice cream scoop. This is much easier. You don't have to turn out the dough onto the counter, and can just scoop it out of the bowl. This time, I got 12 mostly round scones. I did pat down the tops a little before adding the egg wash.

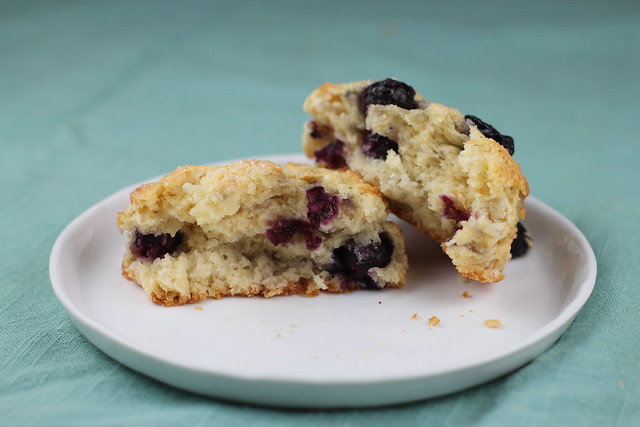
On both mornings, I used frozen blueberries.

Blueberry Buttermilk Scones
Bake until nice and golden brown. I prefer the scooped, round scones - the blueberries stay whole. When you cut the dough, you also cut the blueberries.

Blueberry Buttermilk Scones
These scones are not overly sweet. In fact, you could add an extra tablespoon of sugar to the batter. Don't skip the sanding sugar on top either (in a pinch, you can use sugar in the raw or even granulated sugar) as it offers a nice crunch and sweetness. I've made a lot of scones with butter and heavy cream and those scones are richer (and more calories!). This scones uses buttermilk and butter so they aren't as rich.

Adapted from Martha Stewart Living

Blueberry Buttermilk Scones
Yield: 12 scones

Ingredients:
1 1/2 cups (210 grams) all-purpose flour
1/2 cup cake flour
3 T granulated sugar
1 T baking powder (original recipe: 2 1/2 teaspoon)
3/4 t kosher salt
1 stick (4 ounces) butter, cold and cut into pieces
1/2 cup buttermilk
1 cup blueberries (I used Trader Joe's frozen blueberries)
1 egg
1 t vanilla (original recipe 1/2 teaspoon)

Egg Wash (don't skip this)
1 egg
Sanding sugar

Directions:
1. Preheat oven to 375 degrees F.
2. In a large bowl, mix together the flour, cake flour, sugar, baking powder and salt.
3. Cut in butter with a pastry cutter until butter is pea sized. Add the blueberries and toss in the flour mixture.
4. In a small bowl, whisk together 1 egg, buttermilk and vanilla.
5. Using a fork, mix the liquid ingredients into the dry ingredients until it is mostly combined.
6. If you are making scone triangles or squares, turn dough onto a floured surface and knead gently a few times to incorporate the flour. Pat into a circle and cut into 12 pieces and place on a parchment lined baking tray.
7. If you are scooping the dough, scoop the dough and place on a parchment lined baking tray.
8. Lightly beat an egg. Brush the tops of the scones with the egg wash and top with sanding sugar.
9. Bake at 375 for 22-25 minutes until golden brown. Since I had frozen blueberries, it took 24 minutes.
Pin It!

Chocolate Chip Cookies from WD-50

Friday, February 20, 2015

WD-50 Chocolate Chip Cookies
Chocolate Chip Cookies from WD-50

I usually make the Jacque Torres New York Times Chocolate Chip Cookies but they take 2 days to prep (gotta let the batter rest in the refrig). I didn't have that time so I went looking for an alternate. These Chocolate Chip Cookies were on the New York Times Cooking website and are from WD-50 restaurant in NY.

WD-50 Chocolate Chip Cookies
These cookies have an interesting prep. It starts melted butter whipped together with sugars for 3 minutes (top two photos). It's pretty unusual to use the whisk attachment for cookies! Then you whip in eggs and let that go for 6 minutes (bottom two photos).

WD-50 Chocolate Chip Cookies
After adding the flour mixture (using bread and AP flour) and chocolate chips with a paddle attachment, the dough is very soft and wet. You need to refrigerate it until scoopable (I let mine rest overnight).

WD-50 Chocolate Chip Cookies
According to the recipe, the yield was supposed to be three dozen but I was three short of that.

WD-50 Chocolate Chip Cookies
These cookies are thin & flat with slightly crispy edges, but retain a soft middle. I would add more chocolate chips than the recipe to give it more chocolate flavor. I really enjoyed the taste of the "non-chocolate" cookie part - very nice!

Chocolate Chip Cookies from WD-50

Adapted from Malcolm Livingston II, WD-50, New York Times Cooking website

11 tablespoons/150 grams unsalted butter, melted
1/2 cup/100 grams packed dark brown sugar
1/2 cup/88 grams granulated sugar
1 egg plus 1 yolk
1 cup/150 grams bread flour
1/3 cup/50 grams all­-purpose flour
1 teaspoon/4 grams salt (I used kosher salt)
1/4 teaspoon baking soda
1/4 teaspoon baking powder
3/4 cup/125 grams chocolate chips (I used Nestle semi-sweet. Next time, I would use a full cup of chips)
(Note: There is no vanilla in this recipe)

1. In a standing mixer with the WHISK attachment, whip the butter, brown sugar and granulated sugar for 3 minutes.
2. Add the whole egg and one yolk to the mixture, and whip it for another 6 minutes. The batter will be light in color.
3. Sift together the flours, salt, baking soda and baking powder.
4. Using a PADDLE attachment, slowly add the dry ingredients until almost fulling incorporated. Then add the chocolate chips and mix until the batter is completely mixed together. The dough will be soft. 
5. Chill dough until you can scoop it. (I rested mine overnight). The original recipe says you can also put the dough on parchment paper, roll up, twist ends and chill for 1 hour and then slice the cookie pieces. 
6. After dough has chilled, preheat oven to 375 degrees. 
7. Scoop (or cut if you did the log method) a dozen cookies on a parchment lined baking sheet. You should get close to 3 dozen cookies. Bake for 12-15 minutes, until the edges are golden brown but the center is still soft. 
8. After baking, let sit on baking sheet for a couple minutes and then remove with a spatula to a cooling rack. Enjoy!
Pin It!
Blog Widget by LinkWithin