Planetbox Launch Lunchbox with persimmon, pom, goat cheese, spinach salad, roast beef sandwich on a Trader Joe's roll, tomatoes, TJ pumpkin brittle and blueberries
Hello! Today's post is all about lunch and my cool
Planetbox Lunchboxes! I take lunch seriously. I'm at work for 11-12 hours so lunch and snacks fuel me throughout the day.
I want to tell you about my
Planetbox Lunchboxes - the
Rover and
Launch! I've been using them for six months and love them! They make food pretty, are easy to clean and reduce waste.
These containers are stainless steel with hinged covers. Get that? You can't lose the tops! They are dishwasher safe. I rinse mine at work and then wash it properly at home.
I'm Japanese American and love all things bento...but I would always end up with a drawer full of containers and missing tops or vice versa. And I would keep buying more bento stuff because it is so freaking cute. With the Planetbox, I get the divided container that I want, no plastic, less waste, and an organized way to think about my lunch. It's like creating your own lunchables. :)
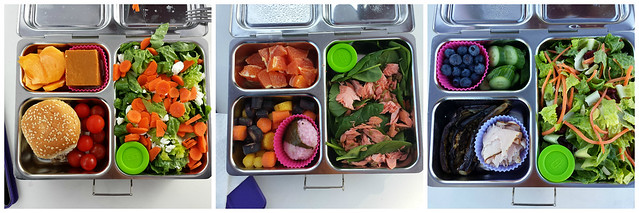
Planetbox Launch model with (left) leftover chicken, peas, potatoes, persimmon, apple, carrots, and (right) teriyaki chicken and rice, potato mac salad (these are leftovers from a dinner at a Hawaiian take out place), kishu tangerine, cucumbers and tomatoes.
Of course, you can't put the metal container in the microwave, but you can purchase the
optional glass insert with lid (above) for the Launch model to reheat food.
There are three models...sort of a baby bear, mama bear and papa bear. I own the mama bear (Rover) and papa bear (Launch). The Rover has 5 sections and can hold 4.5 cups of food. The Launch has 3 bigger and deeper sections and holds 6.5 cups of food.
Planetbox Launch with a few favorite things: 1. Costco Pumpkin Pie - You know that massive pie? If you have leftovers, cut into squares and freeze. 2. That pink thing is the sakura mochi dessert and above it is a cut up cara cara orange. 3. Salad with turkey luncheon meet and some roasted eggplant.
The Launch is great for salads, food that needs to be reheated, or food that just takes up more space.
I purchased the
Planetbox Launch (3 sections) in September 2014 for $49.99 (basic model without the bag). Because they are pricey, I read every review available online and was happy with how satisfied moms were with the product. (A lot of their comments didn't really apply to my 44 year old self since I'm not walking 5 miles in the snow carrying a backpack, I have access to a refrigerator at work, and well, I'm not the type of person who might use the box as a weapon on the playground - the "instruction" sheet says you shouldn't use it as a weapon! :)
After I bought the Launch, I was so pleased with it that I bought the
Planetbox Rover (5 sections) for $39.99 (basic model without the optional inserts or bag). Having both styles has been great...although you don't need to do that in order to have a great lunch.
Here are a few things you should know...along with photos of some of my lunches!
1. Although many kids use the Planetbox system, I think they are perfect for adult work lunches! I even use the hashtag #grownuplunch!
2. I carry my boxes upright/horizontal from home to car to office refrig, so I can have "wet" ingredients and not worry about leakage. My box isn't being walked to school. If your box is going to be tipped, know that you need to have
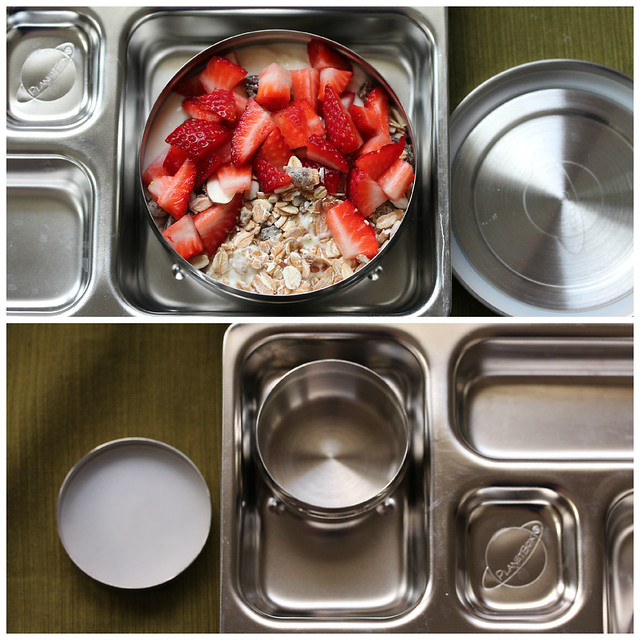
dry ingredients in each section unless you have the glass container for the Launch or PlanetBox Big & Little Dipper containers (above).
3. Planetbox sells
ice sheets for $8 to keep your lunch cool (I bought these and use when I have to go to meeting before going to my office) as well as
insulated bags (I didn't buy any bags because I throw my lunch into a Trader Joe's bag and carry it into work - if you are wondering how big these are, they fit perfectly at the base of a Trader Joe's paper bag).
Planetbox Rovers: Some of my favorites include avocado with a sprinkle of chile con limon, chicken salad with wasa crackers, pickles & artichoke hearts, goat cheese pasta. And yes, things taste better when you alternate the colors of carrots and cucumbers. In the top left, that's a Ramen Broccoli Slaw salad...post on that coming soon!
4. Bulk Bins at Sprouts are my friend. I get just a handful of treats to put in the center of the Rover box. You MUST fill the center space with something yummy...that's one of my rules! :) Also, the Trader Joe's chocolate wedges are perfect too.
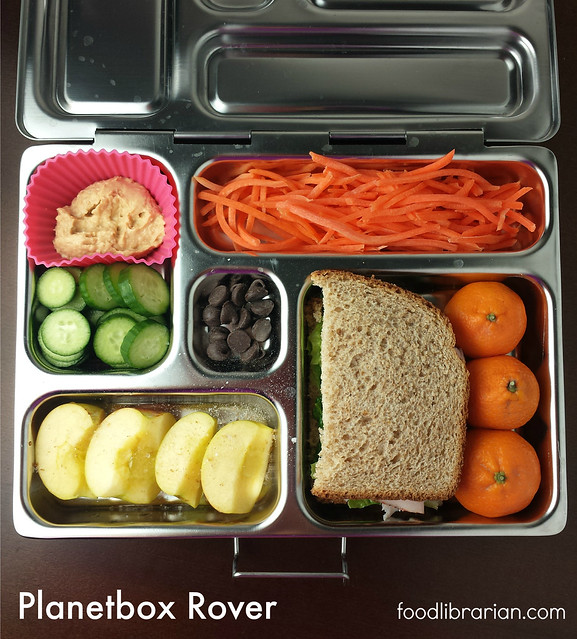
Planetbox with half sandwich, kishu tangerines (super duper small tangerines), apple, hummus, cucumber, carrots, and chocolate chips
5. The Rover's biggest section doesn't hold a full sandwich with most typical sandwich breads. I'm not a big sandwich person so this wasn't a deal breaker. I've seen others just cut off a small edge of the sandwich. You'll see I often use one piece of wheat bread to make half a sandwich or use a slider bun from Trader Joe's. The Kings Hawaiian roll also fits nicely in the Rover.
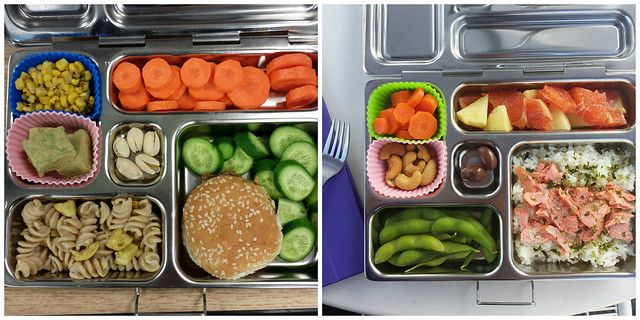
Planetbox Rover lunch with (left) Sandwich with Trader Joe's slider buns (I keep those in the freezer), leftover pasta, veggies including frozen corn, and those green blocks are kinako mochi for dessert, and (right) rice & salmon with furikake sprinkled on top, chocolate covered almonds, edamame and fruit.
6. I purchased
silicon cupcake holders from Amazon to separate food ($7.99 when I bought them in Sept 2014, they are $6.99 today). It keeps things neat and adds fun color!
Planetbox Rover with optional Big & Little Dipper. These containers allow you to carry "wet" food such as yogurts and dips. I would suggest getting these if your lunch is going into a backpack. (Remember, I carry mine straight from car to office refrigerator and I keep it horizontal so I don't worry about wet/dry ingredients as much).
7. The boxes come with magnet decorations. Again, great for kids, but I have just stuck them on my refrigerator (you can choose from different styles). There are also companies online that make custom magnets (No, I'm not tempted to make ones of Cidney the Girl Dog :)
8. Need ideas? Follow the #planetbox hashtag and
@planetbox on
Instagram. My favorite grown-up lunch account is a fellow Californian:
@kbqsurfs She fills her lunches with beautiful produce from the farmer's market - check her out. You'll definitely get hungry! Also,
@Weelicious uses the Planetbox for her kid's lunch (The Planetbox is in her yummy book
Weelicious Lunches too)
9. Things I always have on hand: carrots in different colors - from the Farmer's Market or TJ has Heirloom carrots, Persian cucumbers, bananas, avocados (my farmer's market carries really small ones that fit into the Planetbox! Yes, you start looking at food thinking, "will it fit?"), fruit, and in the freezer I have edamame, frozen veggies, rice, and salmon.
10. On the environmental side, I feel better that I'm not using a million ziploc bags. I keep silverware at work, and I just bought cloth napkins to use. And I carry the
Rocket Bottle with me
when I'm driving around on the weekend!
As if you couldn't tell, I love these lunchboxes. Parents have talked about having them last for over 3 years...and that's with kids. So I know I'll have them for a long time...making pretty lunches to brighten my afternoon! And yes, they are an investment, but I'm saving
So Much Money not buying mediocre fast food lunches.
Whew, this was a long post. Thanks for reading! Follow my instagram
@foodlibrarian to see more lunches! Have a good lunch! If you get one, please let me know and take pics on instagram! I get so many ideas from other lunches!
- mary the food librarian
P.S. I use the divided
Lunchbot for snacks...I'll have to do a post about that in the future! :)
Disclosure: I purchased my own Launch (with
glass insert) and Rover from Planetbox in September 2014 (Launch $60 and Rover $40 plus tax, shipping) - they take PayPal and the shipment was quick. Since I was posting lots of lunches to
Instagram (they regrammed a few), Planetbox contacted me in February 2015 and offered items to review:
Rocket Bottle ($28 value) and Rover inserts:
Big Dipper ($10.25 value) and
Little Dipper ($5.25 value) which I didn't own. I was already planning this blog post about the lunchboxes before Planetbox contacted me - dude, I love them! All opinions are my own.
I bought my
Planetboxes directly from them, but you can also order some styles on Amazon. Another disclosure: I'm in the Amazon Affiliate program and if you buy something by clicking on these links, I get a few cents.