Texas Sheet Cake or The Best Chocolate Sheet Cake (Pioneer Woman)

Thursday, September 29, 2011

Texas Sheet Cake
Texas Sheet Cake or Pioneer Woman's The Best Chocolate Sheet Cake. Ever.

If you are a blogger, do you have orphan posts? Electronic files of photos in your Flickr account with no home? Half finished posts because you may not remember what recipe you even used? Not saying that has happened to me or anything :) ... but here is something I made back in July. Seems like forever ago. I do remember that my co-worker, Kathy loved this cake. So there. That's all you need to know. And Pioneer Woman herself calls it "The Best Chocolate Sheet Cake. Ever."

Texas Sheet Cake collage
This recipe is ridiculously simple. Boil a bit of stuff and pour it into a half-sheet pan. Bake for only 20 minutes and then top with a heated frosting. Seriously easy. I skipped the pecans.

Texas Sheet Cake
The result? A cakey, moist chocolate cake, not as dense as a brownie, with a simple cocoa frosting. Delicious.

Recipe:
Pioneer Woman's The Best Chocolate Sheet Cake. Ever.
Pin It!

Barefoot Contessa's Fresh Nectarine Cake

Tuesday, September 20, 2011

Barefoot Contessa's Nectarine Cake
Barefoot Contessa's Fresh Peach Nectarine Cake

Oh, Ina. I just heart you.
Ina makes a Fresh Peach Cake to celebrate summer. And I'm celebrating the soon-to-be end of summer with a Fresh Nectarine Cake. It takes Los Angeles a while to get into fall...especially since it was 95 degrees this weekend!

Nectarine Cake collage
This recipe has two (count 'em! two!) layers of fresh peaches or nectarines. Lay the thick batter on the bottom of the pan, top with fruit and sprinkle with cinnamon sugar. More batter goes on top and another layer of peaches/nectarines. Ina tops her cake with pecans but I used sliced almonds. I only did half the cake as one of my co-workers doesn't eat nuts (before you go nuts, she not allergic, nuts just bother her tummy).

Barefoot Contessa's Nectarine Cake
If you still have peaches or nectarines available, make this cake as a good-bye to summer! The cake is moist, the fruit is sweet and delicious and it's perfect for breakfast or tea...or anytime!

Barefoot Contessa's Nectarine Cake
Recipe:
Adapted from the Barefoot Contessa's Fresh Peach Cake

1/4 pound (1 stick) unsalted butter, at room temperature
1 cup sugar
2 extra-large eggs, at room temperature (I used 2 large eggs from the fridge, put in warm water for 5 minutes before use)
1 cup sour cream, at room temperature
1 teaspoon pure vanilla extract
2 cups all-purpose flour
1 teaspoon baking soda
1 teaspoon baking powder
1/2 teaspoon kosher salt

3 large ripe peaches, peeled, pitted and sliced

Topping:
1/2 cups sugar
1 teaspoon ground cinnamon

1/2 cup chopped pecans (I used about 1/4 cup silvered almonds on half the cake)

Directions:
1. Preheat the oven to 350 degrees F. Grease a 9-inch-square baking pan. I placed a sheet of parchment paper and sprayed with with Pam with Flour.
2. In a bowl, sift together the flour, baking soda, baking powder and salt. Set aside.
3. In a small bowl, combine the 1/2 cup sugar and the cinnamon. This is the topping. Set aside.
4. In the bowl of the KitchenAid with the paddle attachment, cream the butter and sugar together until light and fluffy on medium speed (about 4 minutes). With the mixer on low, add the eggs, one at a time, then the sour cream and vanilla, and mix until the batter is smooth.
5. With the mixer on low, slowly add the dry ingredients to the batter and mix just until combined.
6. Spread half of the batter evenly in the pan. Top with half of the nectarines, then sprinkle with two-thirds of the sugar mixture. Spread the remaining batter on top, arrange the remaining nectarines on top and sprinkle with the remaining sugar mixture and the pecans.
7. Bake the cake for 45 to 55 minutes, until a toothpick inserted in the center comes out clean. Serve warm or at room temperature. My cake took 60 minutes to cook.
Pin It!

7 Layer Finger Jello

Monday, August 29, 2011

Jello 7 Layer Jello
7 Layer Finger Jello

I used to make 7 Layer Finger Jello a lot, until my friend JustJenn turned me onto Broken Glass Jello. Broken Glass Jello takes less hands-on time in the kitchen. You need to be around more for 7 Layer Jello (each layer needs to chill out for 15 minutes). However, both are tasty and always a crowd pleaser!

Jello 7 Layer Jello
Please make sure you have a level refrigerator! :)

Jello 7 Layer Jello
With the wide variety of flavors now, you can make this layered Jello in all different colors! My original recipe called for lemon, orange, lime, strawberry because they didn't have blue and purple back in the big hair days. (Please note - you only need 3 ounces or a small box of Jello per layer. I'm showing you 6 ounce boxes because that's what I have. I used my scale to measure out half a box, or 3 ounces and saved the rest.)

7 Layer Finger Jello Collage 1
You need to make 4 layers of Jello. It's totally simple. Small box of Jello (3 ounces), and half an envelope of Knox gelatin. Dissolve in 1 cup boiling water, cool to warm temp and then pour into the 9 x 13 Pyrex pan. I make the next flavor while the milk layer is chilling - that allows the mixture to cool for 15 minutes. 

Note: Some recipe books say you should "grease" the pan with mayonnaise or Pam spray. This recipe doesn't call for that and I usually don't grease my pans when making Jello.

7 layer Jello collage 2
The Milk layer is condensed milk, water and some gelatin. You need to bloom the gelatin by measuring out 1/2 cup of COLD water into a small bowl. Then sprinkle 2 envelopes of gelatin on top. Let it sit for 2-3 minutes until the gelatin blooms. Add 1/2 cup of boiling water to fully dissolve the gelatin. Then that mixture gets added to the sweetened condensed milk + boiling water mixture.

Jello 7 Layer Jello
You can change up the colors in all different ways - Red & Green for Christmas, Blue & Yellow for UCLA Football game! I made a Valentine's Day one here. Have fun!!


Recipe:
7-Layer Finger Jello
(adapted from the Arlington Elementary School PTA cookbook, 1979)
Printable recipe here

4 small packages (3 oz) Jello in different colors (such as lemon, orange, lime, strawberry)
(If you buy the larger 6 oz packages, just measure out half the mixture)

4 envelopes of unflavored gelatin (each Knox envelope is 1/4 ounces)

1 can (14 ounces) sweetened condensed milk (not evaporated milk)

Boiling water

You will have 4 layers of Jello and 3 layers of milk. Start and end with Jello.
 
Jello Layer:
Mix one 3-ounce package of Jello with 1/2 package of Knox. (1 package of Knox is approximately 2 1/4 t so half a package is 1 1/8 t).
Add 1 cup boiling water and stir to dissolve.
Cool to room temperature and pour into 9 x 13 pan.
Refrigerate 15 minutes until solid enough for next layer.

Milk Layer:
In a large bowl, mix 1 can sweetened condensed milk with 1 cup boiling water.
In a small bowl, place1/2 cup cold water. Sprinkle 2 packages of Knox unflavored gelatin on the water. Allow to sit for a 2-3 minutes for gelatin to bloom. Add 1/2 cup boiling water to dissolve the gelatin.
Combine the dissolved gelatin with the milk mixture.
This will yield a little more than 3 cups of milk mixture. Each layer will get about 1 cup of milk.
Cool to room temperature and pour over the Jello mixture. Refrigerate 15 minutes until solid enough for next layer.

Repeat Jello and Milk layers (starting and ending with Jello)
Refrigerate until Jello is fully set and cut into blocks or shapes.

See more of my Jello recipes here! Also, check out JustJenn's site for more Jello recipes!
Pin It!

Flour Bakery Yellow Birthday Cake with Fluffy Chocolate Ganache Frosting

Tuesday, August 23, 2011

Flour Bakery - Yellow Cake with Fluffy Chocolate Ganache Frosting
Flour Bakery Yellow Birthday Cake with Fluffy Chocolate Ganache Frosting

My friend Rosie came over to bake! We were supposed to bake together...but somehow I ended up making Jello (that post is coming soon), lying on the couch, eating Red Vines and watching Top Gear. Anyway, I took photos of Rosie making a cake in my kitchen. That's close enough, no?

Flour Bakery - Yellow Cake with Fluffy Chocolate Ganache Frosting
Rosie's been on the blog in the past (Lessons from a Pastry Chef and Challah) and is a recent graduate of the Baking and Pastry Arts program at the prestigious Johnson & Wales University in Rhode Island. She's heading back to finish her BS degree in a couple weeks...and guess who's going to Parent's Weekend?! Road Trip! (Well, JetBlue red eye trip to be exact). My friend Helen (Rosie's mom) and I are going to J&W Family Weekend in early October. I've known Rosie since she was three years old, picked her up from pre-school, been the emergency contact on her school forms, and watched her grow up - so I earned my place at Family Weekend! Can't wait to see Rosie in situ at her college. We have other day trips planned too...more on that later. ;)

Flour Bakery - Yellow Cake with Fluffy Chocolate Ganache Frosting
I've made Flour Bakery's Yellow cake in the past (cupcake form) and I did make the ganache for the frosting. But frosting it? Rosie did all that...while watching Top Gear. Somehow, it took us all day to make this cake, but I'm sure if you are more efficient than us, you will get this done in a jiffy.

Flour Bakery Yellow Cake collage 2
We had about one cup of frosting remaining. We planned to pipe a nice border, but time got away from us and we needed to head out. I dropped off a slice to my friend JustJenn and she said it needed more frosting. I hate frosting so I thought she was crazy (hee hee)...but you might want to use all the frosting.

Flour Bakery - Yellow Cake with Fluffy Chocolate Ganache Frosting
We decided to put little ball decorations on the edges - chocolate balls, pearl balls from NY Cake Company, and silver nonpareils dragees. These silver balls aren't sold in California due to a lawsuit so my friend Mary of Popsicles and Sandy Feet mailed me some from the East Coast. Thanks Mary!

Flour Bakery - Yellow Cake with Fluffy Chocolate Ganache Frosting
Anyone would love this for their birthday!!

Flour Bakery - Yellow Cake with Fluffy Chocolate Ganache Frosting
Cidney the Girl Dog helped (?) out too by just being cute.

Thanks Rosie for coming over and baking! And thanks for helping me reorganize that pesky junk drawer in the kitchen. See you at Family Weekend at Johnson & Wales!

Recipe:
Joanne Chang has very detailed directions in her book. You should really purchase the book Flour Bakery because it is way awesome, or get the book at your library. The Daily Meal posted the recipe.
Pin It!

Strawberry Cake - Martha Stewart

Wednesday, July 13, 2011

Strawberry Cake
Strawberry Cake

When you get pick up a pint of strawberries for less than the cost of a latte, make this cake. Baked up in a pie shell, it is perfect for breakfast or tea. And you know it is one of my favorites because it has (a) no frosting (b) has fruit and (c) quick and easy!!!

Strawberry Cake
I walked through the library right before it opened...it was still warm and totally fragrant...staff actually followed me to the "buffet" (the countertop where I put all the treats).

Strawberry Cake collage 1
A super easy batter that is topped with slices of strawberries. I like that it is baked in a pie pan...it's pie cake!

Strawberry Cake
Have a bite of edible summer!

Recipe:
Strawberry Cake from Martha Stewart
Pin It!

Lemon Blueberry Buckle - Los Angeles Times Food Section

Monday, June 20, 2011

Lemon Blueberry Buckle

Love the Los Angeles Times Food Section! Always yummy recipes, stories, reviews, spotlights on Southern Cal's farmers market and local produce.

This Lemon blueberry buckle appeared in the Los Angeles Times Food Section in May 2009. It is adapted from "Rustic Fruit Desserts" by Cory Schreiber and Julie Richardson. This is a fruit cake, crumb topping and a lemon glaze on top. Oh yes, crumb topping with lemon glaze. Deliciousness.

Lemon Blueberry Buckle collage 1
The buckle is a simple cake with half the blueberries folded into the batter and the rest sprinkled on top. A crumb mixture tops the batter and then it's baked for 45-50 minutes.

Lemon Blueberry Buckle
After the cake is removed from the oven, a warm glaze of sugar and lemon juice is poured over the cake. I took the syrup a bit too far and it caramelized a bit so it was a little dark, but it didn't matter.

Lemon Blueberry Buckle
I brought this into the library and my co-worker did one of those smiling side-to-side sway thank yous. "Oh, it has everything I like. [sway hip to one side] Fruit and that crumbly topping! [sway hip to other side]." I wish I had video. So, make this cake and you'll get people dancing around the office.

Recipe:
Lemon blueberry buckle
Los Angeles Times, Originally published May 27, 2009
Adapted from "Rustic Fruit Desserts" by Cory Schreiber and Julie Richardson
Pin It!

Chocolate Biscotti - Tuesdays with Dorie

Tuesday, June 14, 2011

Chocolate Biscotti - Tuesdays with Dorie
Chocolate Biscotti
For this week's Tuesdays with Dorie selection, Jacque of Daisy Lane Cakes picked Chocolate Biscotti from Dorie's book, Baking: From My Home to Yours.
Chocolate Biscotti - Tuesdays with Dorie
I used raw almonds (chopped a bit) and mini chocolate chips. Next time, I'm going to add dried cherries...that would be awesomeness.

Chocolate Biscotti collage
Biscotti are twice baked cookies. Bake off a log, let cool for a bit and then cut and bake on its side. This finishes the baking and dries them out...making them crunchy. I like to leave a bit of "soft" in the center.

Chocolate Biscotti - Tuesdays with Dorie
Grab a couple biscotti and a cup of coffee or tea. Nothing better.

Chocolate Biscotti - Tuesdays with Dorie
Check out the other Tuesdays with Dorie bakers and see their creations!

Recipe:
Jacque of Daisy Lane Cakes blog,
or, Dorie's book, Baking: From My Home to Yours (page 144)
Pin It!

Zunda Mochi from Sendai Japan

Thursday, May 26, 2011

Zunda Mochi (Sendai speciality)
Zunda Mochi from the Sendai region of Japan

It has been awhile since the Japanese earthquake on March 11, 2011 and the recent tragedies in the mid-west reiterate the power of natural disasters. Japan may have fallen off the front page of the newspaper, but the people in the affected areas are in need of long-term assistance. There are still thousands of people in shelters because their homes were destroyed in the tsunami. One of the hardest hit regions is Sendai, Japan.

Last month, my friend and fellow librarian Jun taught me how to make Zunda Mochi. Jun’s family is from  Sendai and she still has many relatives there. Last year, she visited Sendai and came back with a package of Zunda Mochi which she shared with me. I was immediately smitten. I love all things mochi and the combo of slightly sweetened soybeans or edamame and mochi is a winner.

After the earthquake and updates from Jun about what her family went through, I thought about Zunda Mochi. I wanted to make Zunda Mochi as a celebration of the region's perseverance. Jun said this is a home cooked comfort food; it is sad that so many people do not have homes to return to. I hope you contribute financially to the continuing relief effort in Japan and here in the states. I've listed one way to support Japan at the end of this post.

Zunda Mochi collage 3
Zunda Mochi uses very few ingredients. Really, it is just mochi (rice cakes, unsweetened) with a paste of edamame that has been slightly sweetened. Remember my family's annual mochi making day for New Year's? Well, I still have some mochi in the freezer and we cut some of those pieces. You can also find mochi in the Asian grocery store....just make sure it is plain and unsweetened.

Zunda Mochi collage 1
You need to defrost the edamame (just run it in a colander under water) and remove the outer skin. Yes, one by one! This doesn't take long and if you have a friend with you, it goes by in the flash. You can squeeze them with your fingers and the inner pod just zooms out. The edamame paste freezes really well so you can make a big batch and freeze it. Jun's relatives always have some in the freezer in case a visitor stops by!

Zunda Mochi collage 2
Whiz the naked (skin-off) edamame with some sugar and a bit of water in a food processor. You should get a fairly fine paste...but if you like things a bit chunky, you can leave it more chunky too. You don't want hummus...there should be a little texture.

Zunda Mochi (Sendai speciality)
Boil the mochi (How long depends on the type of mochi you are using. Ours only too a few minutes) and then place it on a plate with a dollop of the paste.

Zunda Mochi (Sendai speciality)
Like all recipes, especially comfort food, there are many variations of Zunda Mochi. The ratio of edamame to mochi pieces varies, and some pastes have more liquid. And some people cook the edamame or the paste...Jun and I didn't do that. Here is I Nom Things version. Google the recipe, find one you like and sit with a friend and shell some soybeans.

Jun - Zunda Mochi
My friend (and soon-to-be mom!) Jun with the dessert of her peeps.

Buy my friend Azusa's Humble Bean Cookbook and help Japan!

One way you can help Japan is by purchasing Humble Bean’s recipe booklet. Azusa, an awesome artist and cook, has created this booklet with proceeds helping the victims in Japan. Buy it here!

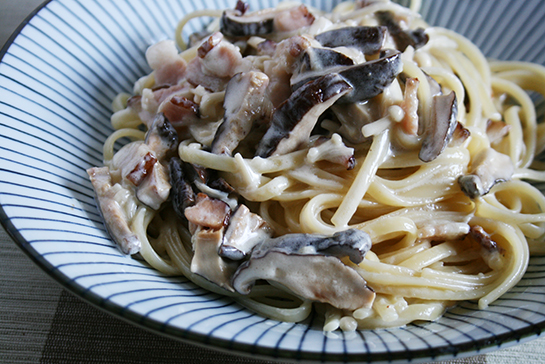
Recipes include this lovely Shiitake and Bacon Pasta and...
  • Quick Japanese Pickles
  • Milk Misoshiru with Kabocha
  • Daikon and Scallop Salad
  • Pan Fried Gyoza
  • Chilled Tomato Somen
  • Shiitake and Bacon Pasta
  • Bacon and Shiso Fried Rice
  • Kuwayaki Donburi
  • Sukiyaki Donburi
  • Tuna and Avocado Donburi
  • Matcha Pancakes
Show your support and get a great cookbook to add to your collection by purchasing Humble Bean's booklet!
= = = = = =
Recipe:
Zunda Mochi
Yields: 2 cups paste

One 16 ounce bag of frozen shelled edamame
1/2 cup sugar
1 Tablespoon water or more as needed
2 pinches of kosher salt

Mochi pieces

1. Remove the skin from the defrosted edamame. You should yield 14 ounces or about 2 1/2 cups of edamame.
2. Place edamame, sugar, water and salt in a food processor. Process into a paste of desired consistency.
3. Boil mochi pieces until soft. Remove and place on dish.
4. Top mochi with edamame paste.
Note: Paste freezes well.
Pin It!

Spinach and Ham Quiche - French Fridays with Dorie

Saturday, May 14, 2011

Spinach and Ham Crustless Quiche - French Fridays with Dorie
Spinach and Ham Quiche

This week, the French Fridays with Dorie group made Spinach and Bacon Quiche from Dorie Greenspan's cookbook Around my French Table.

I did make and eat this on Friday, but ran a little late in my posting.

I'm going to tell you something. In confidence. You know, between you and me.

I stepped on the bathroom scale the other day and there was a number (in big, bright blue digital characters) that is just not right with the world. I mean, the biggest number I've ever seen. Ever.

I'm afraid the state or feds are gonna come barging through the door, while I'm standing in front of an open refrigerator, and arrest me for perjury...for the weight shown my driver's license is, um, not close to the actual number. Oy vey. I need to move a lot more and eat a lot less.

Spinach & Ham Quiche
So, I tried to lighten up my little quiche. I dropped the crust and the bacon. I replaced the bacon with small pieces of ham (way less in fat). But it didn't lose any flavor.

Finally, I know this probably isn't anywhere "around my French table", but I did eat my second half with some Salsa Lizano sauce from Costa Rica. It goes perfectly with egg dishes. :)

Spinach and Ham Crustless Quiche - French Fridays with Dorie
Be sure to check out my fellow French Fridays with Dorie members and see their creations!

Spinach and Ham Crustless Quiche - French Fridays with Dorie
Please note: French Fridays with Dorie will not be posting recipes. Please support Dorie and purchase the book or find it at your library.

Pin It!

Brown Sugar Bundt Cake - Tuesdays with Dorie

Tuesday, May 10, 2011

Brown Sugar Bundt Cake - Tuesdays with Dorie
 Brown Sugar Bundt Cake

For this week's Tuesdays with Dorie selection, Peggy from Pantry Revisited chose Brown Sugar Bundt Cake on page 179 of Dorie's book, Baking: From My Home to Yours.


Brown Sugar Bundt Cake - Tuesdays with Dorie
Dude, it's a Bundt. You know I'm there. I love all of Dorie's Bundt recipes...and this one is no exception. I brought this into the library while it was still warm...and everyone could smell the lovely brown sugar!

Brown Sugar Bundt Cake - Tuesdays with Dorie
Instead of using pears, I used granny smith apples. I also skipped all the nuts and the raisins to make it co-worker friendly. Super easy to make and no frosting. Ah, this is why the Bundt is the greatest baked good on the planet! Darn, I Like Big Bundts. :)

Brown Sugar Bundt Cake - Tuesdays with Dorie
Thanks Peggy for a great pick! Check out the other Tuesdays with Dorie bakers and see their creations!

Recipe:
Peggy from Pantry Revisited blog,
or, Dorie's book, Baking: From My Home to Yours (page 179)
My notes: I used 2 granny smith apples instead of pears. I skipped all the nuts and raisins.
Pin It!