Lemon Blueberry Buckle - Los Angeles Times Food Section

Monday, June 20, 2011

Lemon Blueberry Buckle

Love the Los Angeles Times Food Section! Always yummy recipes, stories, reviews, spotlights on Southern Cal's farmers market and local produce.

This Lemon blueberry buckle appeared in the Los Angeles Times Food Section in May 2009. It is adapted from "Rustic Fruit Desserts" by Cory Schreiber and Julie Richardson. This is a fruit cake, crumb topping and a lemon glaze on top. Oh yes, crumb topping with lemon glaze. Deliciousness.

Lemon Blueberry Buckle collage 1
The buckle is a simple cake with half the blueberries folded into the batter and the rest sprinkled on top. A crumb mixture tops the batter and then it's baked for 45-50 minutes.

Lemon Blueberry Buckle
After the cake is removed from the oven, a warm glaze of sugar and lemon juice is poured over the cake. I took the syrup a bit too far and it caramelized a bit so it was a little dark, but it didn't matter.

Lemon Blueberry Buckle
I brought this into the library and my co-worker did one of those smiling side-to-side sway thank yous. "Oh, it has everything I like. [sway hip to one side] Fruit and that crumbly topping! [sway hip to other side]." I wish I had video. So, make this cake and you'll get people dancing around the office.

Recipe:
Lemon blueberry buckle
Los Angeles Times, Originally published May 27, 2009
Adapted from "Rustic Fruit Desserts" by Cory Schreiber and Julie Richardson
Pin It!

Chocolate Biscotti - Tuesdays with Dorie

Tuesday, June 14, 2011

Chocolate Biscotti - Tuesdays with Dorie
Chocolate Biscotti
For this week's Tuesdays with Dorie selection, Jacque of Daisy Lane Cakes picked Chocolate Biscotti from Dorie's book, Baking: From My Home to Yours.
Chocolate Biscotti - Tuesdays with Dorie
I used raw almonds (chopped a bit) and mini chocolate chips. Next time, I'm going to add dried cherries...that would be awesomeness.

Chocolate Biscotti collage
Biscotti are twice baked cookies. Bake off a log, let cool for a bit and then cut and bake on its side. This finishes the baking and dries them out...making them crunchy. I like to leave a bit of "soft" in the center.

Chocolate Biscotti - Tuesdays with Dorie
Grab a couple biscotti and a cup of coffee or tea. Nothing better.

Chocolate Biscotti - Tuesdays with Dorie
Check out the other Tuesdays with Dorie bakers and see their creations!

Recipe:
Jacque of Daisy Lane Cakes blog,
or, Dorie's book, Baking: From My Home to Yours (page 144)
Pin It!

Zunda Mochi from Sendai Japan

Thursday, May 26, 2011

Zunda Mochi (Sendai speciality)
Zunda Mochi from the Sendai region of Japan

It has been awhile since the Japanese earthquake on March 11, 2011 and the recent tragedies in the mid-west reiterate the power of natural disasters. Japan may have fallen off the front page of the newspaper, but the people in the affected areas are in need of long-term assistance. There are still thousands of people in shelters because their homes were destroyed in the tsunami. One of the hardest hit regions is Sendai, Japan.

Last month, my friend and fellow librarian Jun taught me how to make Zunda Mochi. Jun’s family is from  Sendai and she still has many relatives there. Last year, she visited Sendai and came back with a package of Zunda Mochi which she shared with me. I was immediately smitten. I love all things mochi and the combo of slightly sweetened soybeans or edamame and mochi is a winner.

After the earthquake and updates from Jun about what her family went through, I thought about Zunda Mochi. I wanted to make Zunda Mochi as a celebration of the region's perseverance. Jun said this is a home cooked comfort food; it is sad that so many people do not have homes to return to. I hope you contribute financially to the continuing relief effort in Japan and here in the states. I've listed one way to support Japan at the end of this post.

Zunda Mochi collage 3
Zunda Mochi uses very few ingredients. Really, it is just mochi (rice cakes, unsweetened) with a paste of edamame that has been slightly sweetened. Remember my family's annual mochi making day for New Year's? Well, I still have some mochi in the freezer and we cut some of those pieces. You can also find mochi in the Asian grocery store....just make sure it is plain and unsweetened.

Zunda Mochi collage 1
You need to defrost the edamame (just run it in a colander under water) and remove the outer skin. Yes, one by one! This doesn't take long and if you have a friend with you, it goes by in the flash. You can squeeze them with your fingers and the inner pod just zooms out. The edamame paste freezes really well so you can make a big batch and freeze it. Jun's relatives always have some in the freezer in case a visitor stops by!

Zunda Mochi collage 2
Whiz the naked (skin-off) edamame with some sugar and a bit of water in a food processor. You should get a fairly fine paste...but if you like things a bit chunky, you can leave it more chunky too. You don't want hummus...there should be a little texture.

Zunda Mochi (Sendai speciality)
Boil the mochi (How long depends on the type of mochi you are using. Ours only too a few minutes) and then place it on a plate with a dollop of the paste.

Zunda Mochi (Sendai speciality)
Like all recipes, especially comfort food, there are many variations of Zunda Mochi. The ratio of edamame to mochi pieces varies, and some pastes have more liquid. And some people cook the edamame or the paste...Jun and I didn't do that. Here is I Nom Things version. Google the recipe, find one you like and sit with a friend and shell some soybeans.

Jun - Zunda Mochi
My friend (and soon-to-be mom!) Jun with the dessert of her peeps.

Buy my friend Azusa's Humble Bean Cookbook and help Japan!

One way you can help Japan is by purchasing Humble Bean’s recipe booklet. Azusa, an awesome artist and cook, has created this booklet with proceeds helping the victims in Japan. Buy it here!

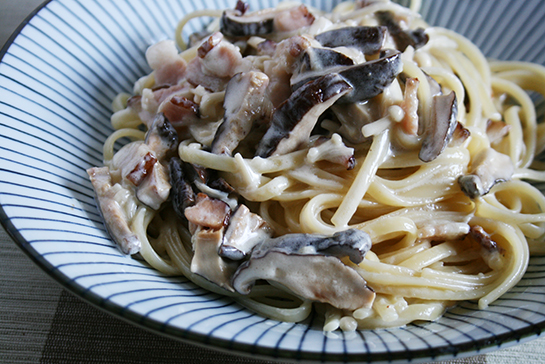
Recipes include this lovely Shiitake and Bacon Pasta and...
  • Quick Japanese Pickles
  • Milk Misoshiru with Kabocha
  • Daikon and Scallop Salad
  • Pan Fried Gyoza
  • Chilled Tomato Somen
  • Shiitake and Bacon Pasta
  • Bacon and Shiso Fried Rice
  • Kuwayaki Donburi
  • Sukiyaki Donburi
  • Tuna and Avocado Donburi
  • Matcha Pancakes
Show your support and get a great cookbook to add to your collection by purchasing Humble Bean's booklet!
= = = = = =
Recipe:
Zunda Mochi
Yields: 2 cups paste

One 16 ounce bag of frozen shelled edamame
1/2 cup sugar
1 Tablespoon water or more as needed
2 pinches of kosher salt

Mochi pieces

1. Remove the skin from the defrosted edamame. You should yield 14 ounces or about 2 1/2 cups of edamame.
2. Place edamame, sugar, water and salt in a food processor. Process into a paste of desired consistency.
3. Boil mochi pieces until soft. Remove and place on dish.
4. Top mochi with edamame paste.
Note: Paste freezes well.
Pin It!

Spinach and Ham Quiche - French Fridays with Dorie

Saturday, May 14, 2011

Spinach and Ham Crustless Quiche - French Fridays with Dorie
Spinach and Ham Quiche

This week, the French Fridays with Dorie group made Spinach and Bacon Quiche from Dorie Greenspan's cookbook Around my French Table.

I did make and eat this on Friday, but ran a little late in my posting.

I'm going to tell you something. In confidence. You know, between you and me.

I stepped on the bathroom scale the other day and there was a number (in big, bright blue digital characters) that is just not right with the world. I mean, the biggest number I've ever seen. Ever.

I'm afraid the state or feds are gonna come barging through the door, while I'm standing in front of an open refrigerator, and arrest me for perjury...for the weight shown my driver's license is, um, not close to the actual number. Oy vey. I need to move a lot more and eat a lot less.

Spinach & Ham Quiche
So, I tried to lighten up my little quiche. I dropped the crust and the bacon. I replaced the bacon with small pieces of ham (way less in fat). But it didn't lose any flavor.

Finally, I know this probably isn't anywhere "around my French table", but I did eat my second half with some Salsa Lizano sauce from Costa Rica. It goes perfectly with egg dishes. :)

Spinach and Ham Crustless Quiche - French Fridays with Dorie
Be sure to check out my fellow French Fridays with Dorie members and see their creations!

Spinach and Ham Crustless Quiche - French Fridays with Dorie
Please note: French Fridays with Dorie will not be posting recipes. Please support Dorie and purchase the book or find it at your library.

Pin It!

Brown Sugar Bundt Cake - Tuesdays with Dorie

Tuesday, May 10, 2011

Brown Sugar Bundt Cake - Tuesdays with Dorie
 Brown Sugar Bundt Cake

For this week's Tuesdays with Dorie selection, Peggy from Pantry Revisited chose Brown Sugar Bundt Cake on page 179 of Dorie's book, Baking: From My Home to Yours.


Brown Sugar Bundt Cake - Tuesdays with Dorie
Dude, it's a Bundt. You know I'm there. I love all of Dorie's Bundt recipes...and this one is no exception. I brought this into the library while it was still warm...and everyone could smell the lovely brown sugar!

Brown Sugar Bundt Cake - Tuesdays with Dorie
Instead of using pears, I used granny smith apples. I also skipped all the nuts and the raisins to make it co-worker friendly. Super easy to make and no frosting. Ah, this is why the Bundt is the greatest baked good on the planet! Darn, I Like Big Bundts. :)

Brown Sugar Bundt Cake - Tuesdays with Dorie
Thanks Peggy for a great pick! Check out the other Tuesdays with Dorie bakers and see their creations!

Recipe:
Peggy from Pantry Revisited blog,
or, Dorie's book, Baking: From My Home to Yours (page 179)
My notes: I used 2 granny smith apples instead of pears. I skipped all the nuts and raisins.
Pin It!

Vegan Chocolate Banana Muffins

Sunday, April 17, 2011

Vegan Chocolate Banana Muffins

I woke up Saturday and wanted to bake something for the library (yeah, most days are like this). Working on Saturdays isn't always the most fun...especially when it's 85 degrees outside and the A/C in the library is broken.

However, I opened the refrig and realized I was out of eggs. What?! Out of eggs? What kind of baker am I? Anyway, I didn't find any eggs, but I did find some old bananas.

Vegan Chocolate Banana Muffins
So, I searched for a vegan recipe and found Love and Olive Oil's Chocolate Banana Cupcakes. Her recipe has a frosting, but I skipped that so I'm calling them muffins.

Vegan Chocolate Banana Muffins collage 1
The recipe includes coconut milk, banana, cocoa powder and a bit of cinnamon. I doubled the amount of cinnamon because I love it.

Quick and easy to make...the resulting muffin is moist. If you are vegan or don't find any eggs in your refrig, give these a try!

Vegan Chocolate Banana Muffins
Recipe:
Love and Olive Oil's Chocolate Banana Cupcakes
Notes:
1. I used 1/4 t cinnamon instead of 1/8.
2. I did not make the frosting.
3. I used Callebaut Dutch processed cocoa powder.
4. I overfilled my muffin tins and got 10 muffins. Baked for 24 minutes. Next time, I will definitely shoot for 12 muffins!
Pin It!

Orange Creamsicle Jello - National Library Week Day #3

Wednesday, April 13, 2011

Creamsicle Jello - Cool Whip & Jello
Orange Creamsicle Jello

Yippee! It's National Library Week! Every day, I’m highlighting a library thing, baking something and giving something away. Today is Day 3 and we are all about the Jello, childhood memories, and free audiobooks & eBooks!

The Library Thing:
Sometimes, you don't have to even walk into the library to grab a book or audiobook! You may be able to download audiobooks and eBooks from your library while in your pajamas. More and more libraries are offering free downloadable books. One of the largest providers is OverDrive and you can download books to almost anything…except a Kindle (Amazon’s economic model is to have you buy books from them). You can transfer to a Barnes & Noble Nook or Sony Reader, and OverDrive has apps for the iPhone, iPad, Android and Blackberries…yes, you can read the latest Michael Connelly while waiting in line at the grocery store! And for those who always have late fees on print books, this is perfect for you... there are no late fees…titles automatically expire! Ask your library if they provide downloadable media!

Creamsicle Jello - Cool Whip & Jello
The Baking Thing:
As a kid, my mom would drive my brother and me through a local "dairy". No, there weren't any animals, but it was the original drive-thru. My mom would pull up the stationwagon and a guy would come to window and take our order. He would grab it from the shelves and refrigerator (mostly milk and Wonder bread) and sometimes, if we were really lucky, my mom would buy us ice cream. I loved the Orange Creamsicle. I would carefully eat the outside to expose the vanilla center before eating that. So, today's treat is a Creamsicle in Jello form!

Orange Creamsicle collage
This is beyond easy to make. Seriously. I mean, it's Jello and Cool Whip. Together. It magically separates as it chills. You can make this tonight and have some happy friends tomorrow. As with all my jello desserts, this was way popular in the library.

Orange Creamsicle Jello collage 1

Recipe:
Orange Creamsicle Jello
2 cups boiling water
1 large box Orange Jello (6 ounces) or 2 small boxes (3 ounces each)
½ cup cold water
2 cups Cool Whip (about 75%-80% of a carton of Cool Whip), thawed
8” square pan

1. Place contents of orange Jello packet in a large bowl. Add 2 cups boiling water. Stir until completely dissolved.
2. Add ½ cup cold water.
3. Stir in 2 cups (about 75-80% of the basic Cool Whip carton) of Cool Whip. It will melt and dissolve. The mixture will be opaque. It will separate into a two layer Jello as it chills.
4. Pour into 8” square pan.
5. Chill until firm (preferably overnight).
6. Cut into squares. I cut 6 x 6 for 36 squares.
Creamsicle Jello - Cool Whip & Jello
The Giveaway Thing:
Day #3: I'm giving away a one-year subscription to Everyday Food. I really enjoy this magazine and thought you might want a copy as well!
To enter, just leave a comment on this post. If your email isn’t associated with your Blogger account, please be sure to leave your email in the message.
Note: This giveaway is limited to United States mailing addresses.
Deadline: Wednesday, April 20, 2011 at midnight, Pacific Daylight Time
Disclosure: This giveaway is paid for by me.
*** Updated: Contest is closed. Congrats to Susan (entry #71) ***
Don't forget to enter the Day #1 (Sarabeth Bakery Cookbook) and Day #2 (Crate & Barrel Ramekins). By the way, thanks to all those who came to the poor rhubarb's defense yesterday! :) I will definitely give it another try...

And, if you are currently working in a library or in library school...stay tuned this week for a special giveaway just for you. :) Happy National Library Week! Libraries, librarians and library staff rock!
Pin It!

Espresso Bundt Cake - National Library Week 2011 Day #1

Monday, April 11, 2011

Margaret's Espresso Bundt Cake (from Sarabeth Bakery's)
Espresso Bundt Cake for National Library Week 2011

Whooooo Hoo!! It's National Library Week!! This is my third year celebrating NLW on the blog. Every day, I’m highlighting a library thing, baking something and giving something away. Sound like a plan? Okay, here goes Day 1.

The Library Thing:
Dude, of course today’s library thing is your library. It’s a fantastic place where you get to grab stuff and bring it home. FREE. You just need to bring it back. How many other places let you do that? McDonald’s? Starbucks? Your cable company? Nope. The library gives you stuff free. Cool. Go. Visit. Check out stuff. Tell your friends. And treat our DVDs nicely please.

Espresso Bundt collage 2
Yes, there is the Librarian Action Figure. It's based on real-life librarian and author Nancy Pearl (you can hear her on NPR). And she's showing you this cake has coffee and instant espresso. It's caffeinated and good.

The Baking Thing:
A Bundt. What else would I make?! This is a DELICIOUS bundt. The crumb is awesome. It's from Sarabeth's Bakery: From my hands to yours - a lovely new cookbook by Sarabeth Levine. This is the first item I've made and it rocks. Can't wait to try some more recipes...and if you want to make some, keep reading for a chance!

Espresso Bundt collage 1
This has coffee and espresso in the batter and glaze. But it isn't overpowering...just a great cake that is perfect with, you guessed it, a cup of coffee or tea.

Margaret's Espresso Bundt Cake (from Sarabeth Bakery's)
Look at that lovely crumb!

Margaret's Espresso Bundt Cake (from Sarabeth Bakery's)
The Giveaway Thing:
Day #1: I'm giving away a brand new copy of Sarabeth's Bakery: From my hands to yours cookbook!
To enter, just leave a comment on this post. If your email isn’t associated with your Blogger account, please be sure to leave your email in the message.
Note: This giveaway is limited to United States mailing addresses.
Deadline: Wednesday, April 20, 2011 at midnight, Pacific Daylight Time
Disclosure: This giveaway and shipping is paid for by me.
*** Updated: Contest is closed. Congrats to Ann (entry #95) ***
Recipe:
Espresso Bundt Cake
Adapted from: Margaret's Espresso Cake in Sarabeth's Bakery, From Hands to Yours (Sarabeth Levine)
Find it on Amazon or check to see if your library has it here!

Printable copy here

Cake:
1 cup hot strong coffee (I used one packet of Starbucks Via)
3 Tablespoons instant coffee or espresso (I used instant espresso)
3 cups all-purpose flour
2 1/2 t baking powder
1/2 t kosher salt
2 sticks butter, chilled and cut into cubes
2 cups sugar (recipe calls for superfine sugar, but I didn't have any)
1 t vanilla extract
4 large eggs, separated and at room temperature

Glaze: (This is different from the cookbook. Check page 117 of the cookbook for Sarabeth's version. She heats the glaze and uses brewed coffee and espresso powder)
1 teaspoon instant espresso
1 Tablespoon boiling water
1 Tablespoon milk (I used soy milk because I had that on hand)
2 cups powdered sugar

Cake:
1. Prep bundt pan. Preheat oven to 350 degrees.
2. Mix hot coffee and espresso powder to dissolve. Let cool.
3. Sift together dry ingredients (flour, powder, salt) in a bowl.
4. Beat butter in mixer with paddle attachment at high speed until smooth (1 minute or so). Gradually add in sugar. Add vanilla. Beat until light in color.
5. Add the eggs yolks one at a time, blending in each one before adding the next.
6. On low speed, alternate adding 1/3 of the flour mix and 1/2 of the coffee mix, starting and ending with the flour. Beat until combined, but don't overbeat.
7. In a separate bowl, whip egg whites to soft peaks.
8. Fold some of the egg whites into the batter to lighten it, then carefully fold the rest of the egg whites into the batter.
9. Pour batter into Bundt pan. Smooth out the top and place in the oven.
10. Bake for 55 to 60 minutes, depending on your oven. A cake tester should come out clean. Cool on a wire rack for 15 minutes, then invert onto a cooling rack. Make sure the Bundt is cool before glazing it.

Glaze:
1. In a bowl, dissolve instant espresso in boiling water. Add milk. With a whisk, gradually add the powdered sugar. The consistency should be pourable...add some powdered sugar (to thicken) or milk (to thin) if necessary.
2. Pour over cooled Bundt cake. Let sit for a few minutes before cutting.
Pin It!

Furikake Chex Mix or Furikake Party Mix

Saturday, April 9, 2011

Furikake Chex Mix or Furikake Party Mix

Who doesn't love a snack? And this one - Furikake Chex Mix? It's slightly sweet, a bit salty and oh so yummy!

Furikake Party Mix Collage 2
This is an Asian / Hawaiian version of Chex Mix. A buttery, sweet syrup covers any number of cereals, chips and popcorn and a bottle of Furikake tops the goodness. Furikake is a rice topping of seaweed, sesame seeds, salt and sugar.

Furikake Party Mix Collage 1
For this version, I included Crispix, Corn Chex, Popcorn, Bugles and, of course, a bottle of Furikake. You can pick up a bottle of Furikake at a Japanese or Asian grocery store. It is a yummy topping on rice...kids really like it. However, be sure you look at the ingredients. This is the "Nomi Komi" Furikake that has seaweed (nori), sesame seeds, sugar and salt. There are a bunch of varieties and some include wasabi, bonito (fish) flakes and other stuff. Avoid the one with bonito or fish for this snack!

Furikake Chex Mix or Furikake Party Mix
The mix is coated with a syrup of butter, oil, sugars, soy sauce, and some corn syrup. A bottle of Furikake is sprinkled on top and the mix is baked at low heat for an hour. You may need a couple bowls to mix everything!

Furikake Chex Mix or Furikake Party Mix
Sweet, Salty, and Crunchy. My favorite flavors all in one. I can eat a whole batch of this while watching Law & Order: UK, The Closer, or the new AMC show The Killing. Yay, I got a bunch of stuff on my DVR.

Bake Sale for Japan 4/2/2011
I made the Furikake Chex Mix for the recent Bake Sale for Japan. This was a nation-wide fundraiser that raised $2,500 in Los Angeles alone! Check out Bake Sale for Japan to see the final total (they are still tallying)! Thanks to all those who baked, purchased and supported the event.

Recipe:
Printable recipe here

Furikake Chex Mix or Furikake Party Mix
1/2 stick butter
1/4 cup granulated sugar
1/4 cup brown sugar
1/4 cup vegetable oil
1/4 cup light corn syrup
1 Tablespoon soy sauce
1 bottle Nomi Komi Furikake
Cereal, Chips, Popcorn, or Pretzels

You can use any number of cereals that equal about 2 boxes of Chex Mix or Crispix.

For this batch, I used 1/2 box of Crispix (about 5 cups), 1/2 box of Rice Chex, 4 cups of plain popcorn, and 1 bag (4.1 ounces) of Bugles chip-things (are Bugles chips or cones?) I've seen pretzels added to this mix. Use your imagination!

1. Preheat oven to 250 degrees F. Line a couple 9x13 pans or sheet pans with foil (for easy clean up)
2. Heat oil, butter, corn syrup, soy sauce and sugars in a saucepan until butter melts and the sugars dissolve.
3. Place the cereal in a bowl or two, and drizzle some of the syrup over the cereal and carefully mix with a rubber spatula or spoon. Sprinkle some of the Furikake over the mix. Continue drizzling and mixing the syrup and Furikake until the cereals are coated.
4. Place mixture on the pan and bake for 1 hour. Stir the mix every 15 minutes.
5. Let mixture cool and enjoy!
6. Store in airtight container...if you have any left.
Pin It!

St. Patrick's Day Jello Cream Cake

Tuesday, March 15, 2011

St Patrick Jello Cream Cake
St. Patrick's Day Jello Cream Cake

Happy almost St. Patrick's Day!

You know I have a major thing for Jello and my co-workers love it too. So, I pulled out a card from my mom's cookbook and made this Jello cream cake. My auntie used to make this every holiday season as well (it is great with a topping of Cherry Jello!)

St Patrick Jello Cream Cake collage 1
The crust is butter, brown sugar, flour and nuts. Easy peasy to make! Bake it off and let it cool before adding the next layers.

St Patrick Cream Cake collage 2
The ingredients are simple. Jello, cream cheese, heavy whipping cream and a little more sugar. The middle layer is cream cheese and sugar with whipped cream folded in. The lemon Jello is dissolved and gives the layer stability because of the gelatin.

St Patrick Jello Cream Cake
A big tray of this gelatin treat is always a big hit at potlucks or...the library! :)

If you don't want to make this one for St. Patty's day, try the Ice Cream Jello I made two years ago!

St Patrick Jello Cream Cake
Jello Cream Cake
Printable Recipe here

Crust:
1 1/2 sticks - butter, softened
1/2 c brown sugar
1 1/2 c flour
1 c chopped walnuts or pecans

Cream Layer:
1 - 3 oz package of lemon Jello (small box)
1 c boiling water
1/2 c sugar
8 oz package of cream cheese (one block), softened
1 cup heavy whipping cream

Jello Layer:
1 - 6 oz package lime Jello (large box)
2 c boiling water
1 c cold water

1. Make the crust. Cream together butter and brown sugar until smooth. Add flour and nuts to the mix. Press dough into buttered 9 x 13 inch pan. I use the Pyrex pan. Bake crust for 10-15 minutes in pre-heated 375 degrees oven or until crust is brown. Let cool.
2. Make cream layer. Dissolve lemon Jello with 1 cup boiling water. Let this mixture cool. In a large bowl, cream together sugar and cream cheese. In a separate bowl, whip the heavy cream to stiff peaks (but don't make butter). Fold the whipped cream into the cream cheese mixture. Don't worry about it blending perfectly. Add the cooled lemon Jello and hand whisk together. Pour cream mixture over cooled crust and chill until firm in the refrigerator.
3. Make the Jello layer. In a large bowl, dissolve lime Jello with 2 cups boiling water. Add 1 cup cold water. Let this mixture cool. Pour on top of cheese mixture and return to refrigerator to cool completely.
4. Cut and enjoy!
5. Notes: You can, of course, change the color to suit your mood or holiday. This makes a bunch and can get pretty tall! When you add the cream layer, make sure you leave space for the top Jello layer. I usually place the 9 x 13 pan on a half-sheet pan in case I have spillage when placing the top layer on the cake!
Pin It!