Kitchen Essentials (According to the Food Librarian)
I went to Crate & Barrel this weekend for some holiday shopping. The only way I can handle Xmas shopping is at night and with an audiobook playing in my head. Tonight, it was related to the Serial podcast. Have you been listening? So good. (You can find Episodes 1-11
here...and then just binge listen while shopping, driving or baking). Anyway, I heard Episode 11 and I'm just waiting for the last Episode to come out on Thursday. So what's a person to do while they wait? Listen to a podcast of people who are also waiting for the next Serial podcast. I listened to
Serially Obsessed for Episode 11. Yes, I'm obsessed too.
Updated to add: Episode 12 was really good...but I want more!
Anywho, sorry that was a long intro/tangent...when I was in Crate & Barrel I came across the most ridiculous gadgets: The
Mini Scone pan ($34) and the
Butter Slicer ($9). I immediately posted a photo online with the caption:
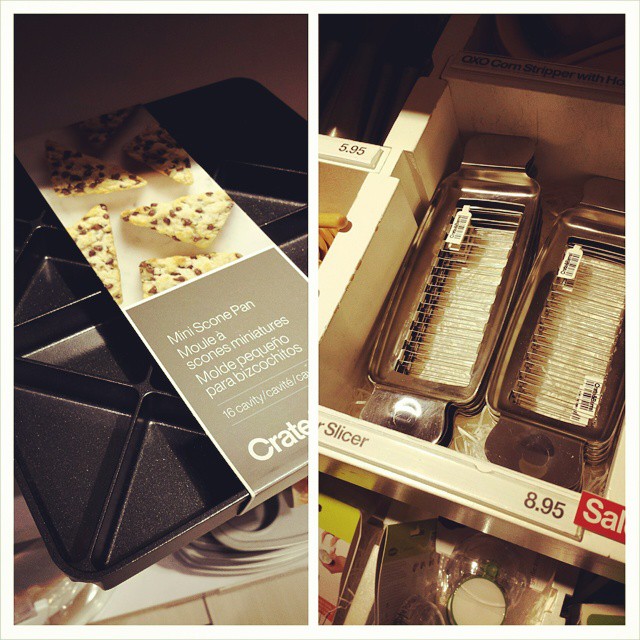 The Mini Scone Pan and Butter Slicer.
You already have these tools.
It's called a knife.
The Mini Scone Pan and Butter Slicer.
You already have these tools.
It's called a knife.
And it definitely hit a nerve...thank goodness I'm not the only one who thinks these are clutter-making gadgets.
Diane and I "talked" (you know, commenting on Instragram photos or via twitter is totally talking), and she mentioned using a bench scraper for these tasks too. I agreed that the bench scraper would totally work and is an kitchen essential. That got me thinking...what else do you need in your kitchen? Here goes:
Essential Practice Must-Have Kitchen Equipment List
AKA The Top 15 Items I would Unpack First If I Ever Moved
1. KitchenAid Stand Mixer
Can't live without this and most cookbooks expect you to have one. It doesn't need to be a fancy one...I've used the basic model for 20+ years.
2. Half Sheet Pans with Lid
Forget cookie sheets, these half sheet pans are so versatile. You can make thin sheet cakes like Texas Sheet Cake, cookies, roast chicken breasts, roast vegetables, and use them as a tray to carry stuff at dinner. Getting a few lids is helpful too! You can stack them in the fridge and they aren't as tall as a traditional 9 x 13 pan. I have about 10 of these in the kitchen so I made multiple trays of cookies without having to cool off and wash them between batches.
3. Parchment Paper Pan Liner for the half sheet pan (pre-cut)
These are so great. I buy them at a restaurant supply place in boxes of 1,000 sheets. You can use them on the half-sheet tray for cookies, fold to line a 9 x 9 square pan so it makes a sling (for easy removal of your brownies), sift ingredients onto the parchment and then pour it into the KitchenAid mixer slowly, and So Much More. I'm not a fan of the Silpat because you have to wash it, and the parchments are disposable and easy to use.
4. Bench Scraper
(this one by Oxo has a comfortable handle) but this cheaper
wood handle bench scraper works too.
You can cut scones into triangle with this!
You can cut butter with this!
See, I just saved you $43 at Crate & Barrel!
5. Rubber Scraper or Spatula
I get mine at Smart and Final or a restaurant supply place. You might want to mark a set "Baking Only" with painter's tape or a Sharpie. Because they are rubber and/or silicone, they really keep the smells of garlic, at least in my experience.
6. Ice Cream Disher or Ice Cream Scoop
 of various sizes and the
Cookie Scoop
Must haves in the kitchen for dishing out the same size baked goods: cupcakes, drop scones and biscuits, cookies, etc.
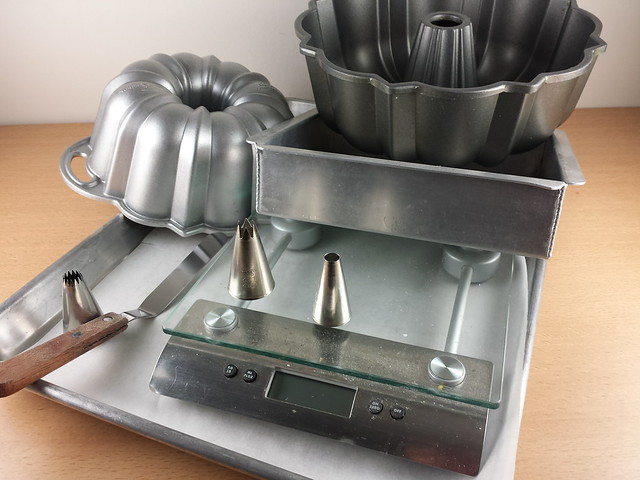
7. Kitchen Scale
Make sure it is digital (more accurate reading) and that it can easily switch from grams to ounces (I prefer grams because it is easier to half or double a recipe, but many times you'll need ounces too). It's always faster to weigh the ingredients and it's more accurate!
8. Bundt Pan (dude, of course)
You really only need the basic one (
12 cup Nordic Ware Bundt Pan) but you might want to get a fancy one and a 6-cup Bundt too.
Read this post I wrote about my collection of Bundts.
9. 8" and 9" cake rounds and 8" and 9" square cake pans
Need rounds for birthday cakes and squares for brownies and snack cakes!
10. 9" x 13" Cake Pan
I like Magic Line's cake pans and their straight edges. They bake evenly too.
Read my post about Magic Line.
11. Wire Rack (Half Sheet Size)
These are great because they fit inside a half-sheet pan. They can cool cookies, but you can also lay bacon or kale on it and pop it in the oven.
12. Big Old Sarah Wrap
If you are in the kitchen for any amount of time, I think you need to ditch the hand rolls of plastic wrap in favor of the industrial box. I've used one of these for years and can't image trying to wrap a half sheet tray with a little box. This lasts a long time (my friend is on 5 years, but I usually go through one in about 18 months). I get this one at Costco.
13. Good Vanilla (Nielsen-Massey)
Good vanilla goes a long way to making cakes taste good. I buy this mega bottle.
14. Big Pastry Tips and Disposable Pastry Bags
I like the
big pastry tips to quickly frost cupcakes, but a
basic set in a box
is good too.
This is
100 bags is only $9. You can also get larger
18" bags.
15. Offset Spatula
I own at least 6 of these. Big ones and little ones. They frost. They ease muffins out of the cupcake tray. They get cookies off parchment. They smooth out batter in a pan. They rock.
Bonus: Good Cookbooks
My favorites are by Dorie Greenspan! Buy her latest one - Baking Chez Moi :)
Here are the photos from Amazon of the items I mentioned above. Happy shopping and avoiding the scone tray... :) - mary
P.S. You can get these products at most kitchen supply stores. I used Amazon because they have pictures. Also need to disclose that I'm part of Amazon's Affiliate program so if you buy anything these links, then I get a few cents (doesn't cost you anything and I'll never know who buys what).